

Data Protection
Introduction
Safeguard 3 - Data Protection
Data protection is a crucial component of cyber security. Through data management, risk classifications and protection measures are defined to meet compliance requirements and best protect sensitive information. It’s important to be able to locate sensitive information and securely remove it once it’s no longer needed.
Procedures
3.1 - Establish and Maintain a Data Management Process
A data management process addresses data sensitivity, assigns roles and responsibilities regarding data processes, and defines the processes for retaining and removing data. This documentation should be reviewed and revised annually.
Please refer to the following documentation for more information about Virginia Tech’s data management process:
- Policy 7100 - Administrative Data Management and Access Policy
- Standard for Administrative Data Management
- Standard for High Risk Digital Data Protection
- Virginia Tech Risk Classifications
In the event of data exposure, refer to the data exposure procedures.
3.2 - Establish and Maintain a Data Inventory
University assets classified as “High-Risk” must be entered and kept up-to-date in the ITSO’s GRC system, and all applicable “High-Risk” data categories must be identified in the asset record(s). At minimum, all sensitive data should be inventoried. Review and update the inventory at least once per year, prioritizing sensitive data.
Virginia Tech has defined six specific data elements as Personally Identifiable Information (PII) in the Standard for High Risk Digital Data Protection:
- Social Security number
- Credit card number
- Debit card number
- Bank account number
- Driver’s license number
- Passport number
The standard defines additional data elements and their protections:
- Military ID numbers
- Medical and mental health history, treatment, or diagnoses information
- Health insurance policy numbers
- Student data (non-directory information or items marked confidential) (FERPA)
- Export controlled research data (ITAR, EAR, CUI and others)
At Virginia Tech, there are several roles responsible for data protection that are defined in the Administrative Data Management Standard as follows:
Data trustees are senior university officials responsible for planning and creating policies regarding university data management.
Data stewards typically classify data according to the Virginia Tech Risk Classifications, define and monitor data quality, monitor data flow, and create data definitions. Their responsibilities are assigned by their respective data trustee, and the guidelines for data stewards are available online.
Other roles such as data experts, data custodians, and data managers have day-to-day responsibilities regarding business processes. They work under the direction of a data steward.
Locating Sensitive Data with Spirion (Formerly Identity Finder)
Spirion looks for sensitive data (i.e. the PII defined above). It is a powerful tool that is available to Virginia Tech faculty and staff via https://network.software.vt.edu.
- Follow the installation instructions for your operating system.
- Refer to the Getting Started guide for your operating system.
Locating Sensitive Data with FindSSNs
FindSSNs is a tool to find sensitive information, including SSNs, credit card numbers, and debit card numbers. It’s freely available to everyone at https://security.vt.edu/software/find-ssns/. Additionally, refer to the FindSSNs Reference Manual for more information regarding config files, program arguments, and output files.
Windows
- Download FindSSNs from https://security.vt.edu/software/find-ssns/.
- Unzip the file by right-clicking the file and clicking Extract All. Follow the on-screen instructions.
- Double-click the
Find_SSNs.exeexecutable.
Linux
- Download FindSSNs from https://security.vt.edu/software/find-ssns/.
- In the File Explorer, right-click the file and click Extract Here, or Extract to… if you wish to extract it to a specific directory. Alternatively, you may use the
unzipcommand. - Run the command
python Find_SSNs.pyw | Find_SSNs.exeto attempt to execute FindSSNs in GUI mode. Note: Python 2.4 through 2.6 and wxPython are required for GUI mode to work on Linux distributions. - If running FindSSNs in non-GUI mode, usage is as follows:
python Find_SSNs.pyw -p /path/to/search -o /path/to/output/folder -t html|csv [-a | -c | -s] Find_SSNs.exe -p c:\path\to\search -o c:\path\to\output\folder -t html|csv [-a | -c | -s]
Options
-p The path to the directory to be searched. The path will be searched recursively.
-o The path to the directory that will contain FindSSNs output files. See OUTPUT FILES section for more information.
-t Type of main report file you would like FindSSNs to produce. Only html or csv are supported. Introduced in version 4.1. If you are using an earlier version, omit this option.
-a Search files for both U.S. Social Security numbers and Credit Card numbers.
-c Search files only for Credit Card numbers.
-s Search files only for U.S. Social Security numbers.
3.3 - Configure Data Access Control Lists
An access control list (ACL) determines what roles can access certain sensitive information based on data classifications. ACLs use the principle of least privilege, where the only users that are able to access sensitive data are those that need it to accomplish their work. This principle ensures that the minimum number of people necessary have access to sensitive data, minimizing the risk of data leaks.
- Endpoints should be configured to prohibit anonymous access. Enforce a secure password policy. Require a password-protected lock screen, preferably with a 15 minute timer for inactivity. All devices should be locked before being left unattended.
- Servers should review account access and permissions at least annually and enforce policies for endpoints.
- Applications should review account access and permissions at least annually and enforce password creation requirements.
The Data Steward should work with their relative Data Trustee and the IT Security Office to assure that data is classified according to the Virginia Tech Risk Classifications.
- Identify sensitive data using the Virginia Tech Risk Classifications.
- Create an access control list to determine which roles within your department or work group should and should not have access using the principle of least privilege.
- Implement the ACL using relevant access controls.
Please refer to Policy 7100 - Administrative Data Management and Access Policy for more information regarding data administration and transparency.
Managing Access Control with Microsoft Intune
3.4 - Enforce Data Retention
Sensitive data should only be stored for as long as it’s needed. Data inventories should be regularly reviewed to determine what should be securely disposed of.
Refer to the Virginia Tech Record Management Services for more information.
3.5 - Securely Dispose of Data
Hard drives should be wiped before disposal. If they are not, VT data may be exposed to whomever obtains them. Servers and endpoints will have at least one physical hard drive and possibly more drives configured in a logical RAID array. This procedure covers how to wipe each physical hard drive. Before following this procedure, you must know how many hard drives are in the server or endpoint.
- Make sure to copy all the files that you wish to keep from the hard drive(s).
- Download the latest Debian ISO image and copy it onto a CD, DVD or USB stick. Follow the Debian instructions on how to do this.
- Set the server or endpoint to boot from CD, DVD or USB.
- After booting Debian, wipe each physical hard drive using this command.
$ dd if=/dev/urandom of=/dev/YOUR-HARD-DRIVE-LABEL bs=1M - The process may take anywhere from several hours to several days (depending on the size of the hard drives).
- Once the process is complete, remove the CD, DVD or USB Drive, run this command, wait for it to finish, then power off the server or endpoint.
$ sync - Surplus the server or endpoint by following the instructions on the Surplus Procedures web page.
3.6 - Encrypt Data on End-User Devices
Microsoft Windows
Disk encryption is a great way to protect the data on a device so it can only be accessed by those who have authorization. The following information is from the Microsoft Windows Support Website
- Sign into Windows with an administrator account
- Select the Start button, then select Settings > Update and Security > Device Encryption. (If Device Encryption does not appear, follow the BitLocker encryption instructions)
- Open Device Encryption
- Select Turn On
BitLocker Encryption (Only available on Windows 10 Pro and Enterprise)
- Sign into Windows with an administrator account
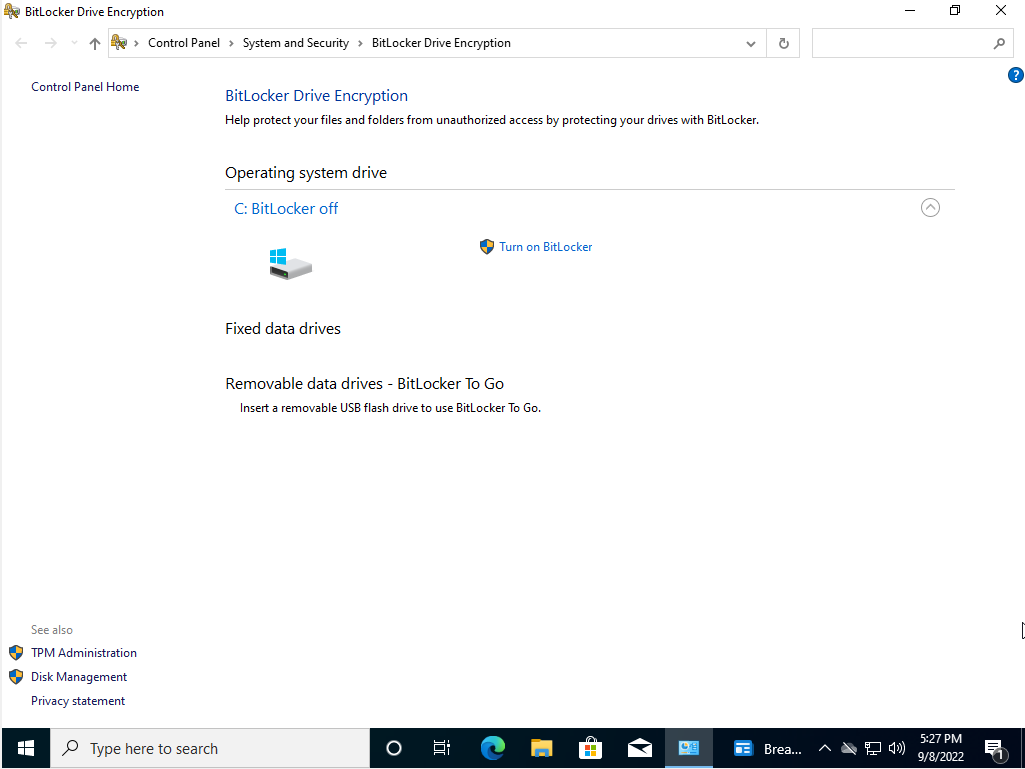
- In the search box on the taskbar, type Manage BitLocker and select it from the list of results
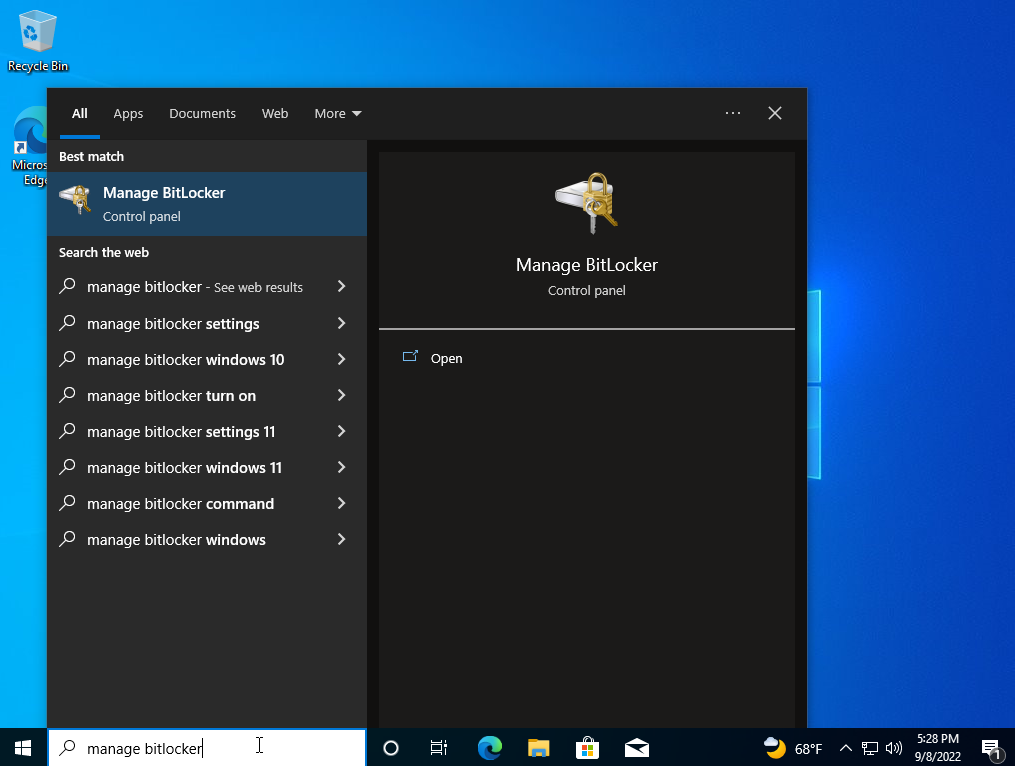
- Select Turn on BitLocker
- Follow the on-screen instructions
Apple FileVault
To enable disk encryption on macOS we will use a service called FileVault 2, which is available on OS X Lion or later.
- Choose Apple Menu > System Preferences > Security & Privacy.
- Choose the FileVault tab.
- Choose the Lock symbol, then enter the administrator’s name and password.
- Choose Turn On FileVault.
- If there are multiple users on the Mac, you will choose who will have to unlock the disk with their password.
- Choose who you will recover your disk in case you forget your password.
- The encryption will begin in the background on your Mac, you can view the process in the FileVault section of Security & Privacy.
Linux dm-crypt
Disk encryption is available on Linux via dm-crypt. WARNING the following will overwrite all data on the partition you decide to encrypt.
To install dm-crypt on Ubuntu and Debian, run the following command:
# apt-get install cryptsetup
To install dm-crypt on Fedora, run the following command:
# yum install cryptsetup
dm-crypt
To encrypt a specific partition, use the following instructions:
- First we need to create a cryptographic device mapper in LUKS encryption:
# cryptsetup --verbose --cipher aes-xts-plain64 \\ --key-size 512 --hash sha512 --iter-time 5000 \\ --use-random luksFormat /dev/<name of partion> - Follow the on-screen instructions to create a password.
- In order to unlock the device, run the following command.
# cryptsetup open --type luks /dev/<name of partion> <device label> - You can then mount the device to transfer data.
# mount -t ext4 /dev/mapper/<label> /mnt - Unmount the device when you are done.
# unmount /mnt
cryptsetup close <label>
3.7 - Establish and Maintain a Data Classification Scheme
See Virginia Tech’s Risk Classification Standard.
3.8 - Document Data Flows
The flow of data should be documented alongside the development of data inventories (see Safeguard 3.2) using data classifications.
- Create documentation outlining where enterprise owned data originates from and goes to. At a minimum, this should include data flows to external enterprises.
- Review the aforementioned documentation at least annually and when there are enterprise changes that affect the flow of data.
3.9 - Encrypt Data on Removable Media
Microsoft Office File Encryption
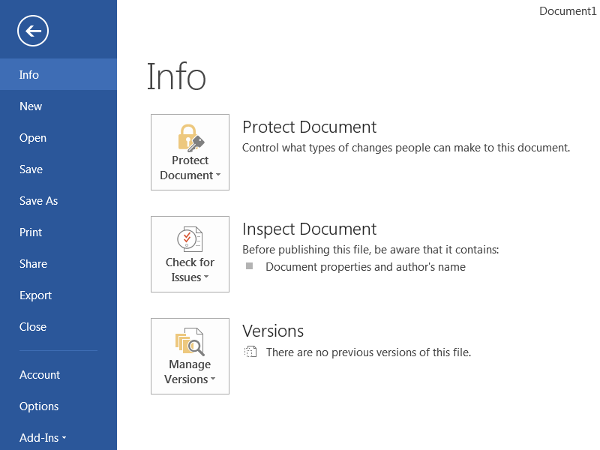
- In order to encrypt a Microsoft Office document, click the File tab to bring up the following menu. Then, view the Info section.
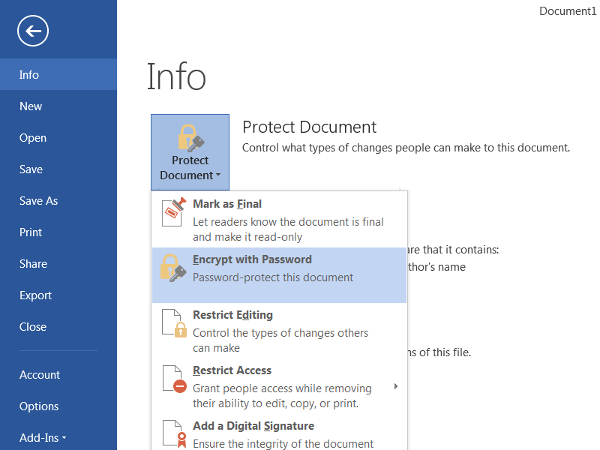
- Click the icon to Protect Document (or Worksheet / Presentation) and select Encrypt with Password from the dropdown menu.
- It will prompt you to input a password to encrypt the document (a longer password is more secure). Then, click OK.
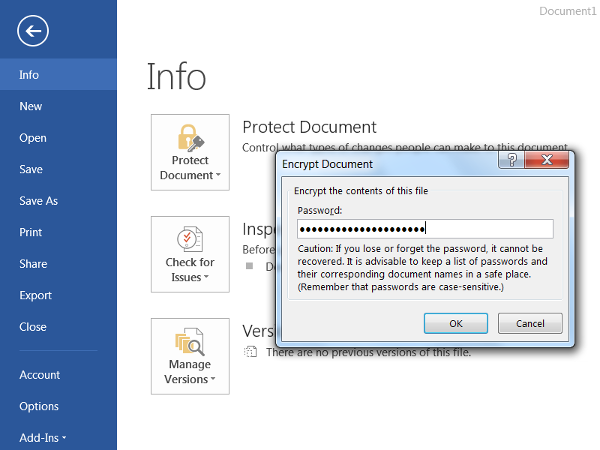
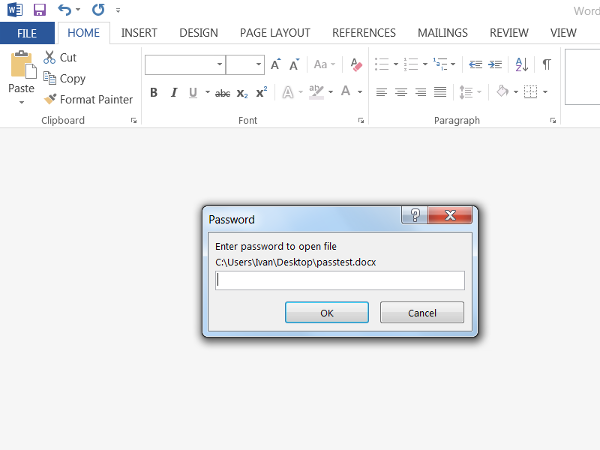
- The next time the document is opened, Microsoft Office will ask for the password before allowing the document to be viewed or edited.
PDF File Encryption
These instructions are for Adobe Acrobat Pro 2020. If you use some other PDF software, you should follow one of the other file encryption procedures listed on this page.
To share files encrypted with Adobe Acrobat Pro 2020, you can encrypt the file using a Digital Certificate, ensuring only specific people can view the document. To do so, follow the following steps.
- Go to vt.edu.
- In the search bar, search for the name of the person you want to receive the document.
- Select that person.
- Next to PDC, select and download their .pem file.
- In Adobe Acrobat, select Tools > Protect > Encrypt.
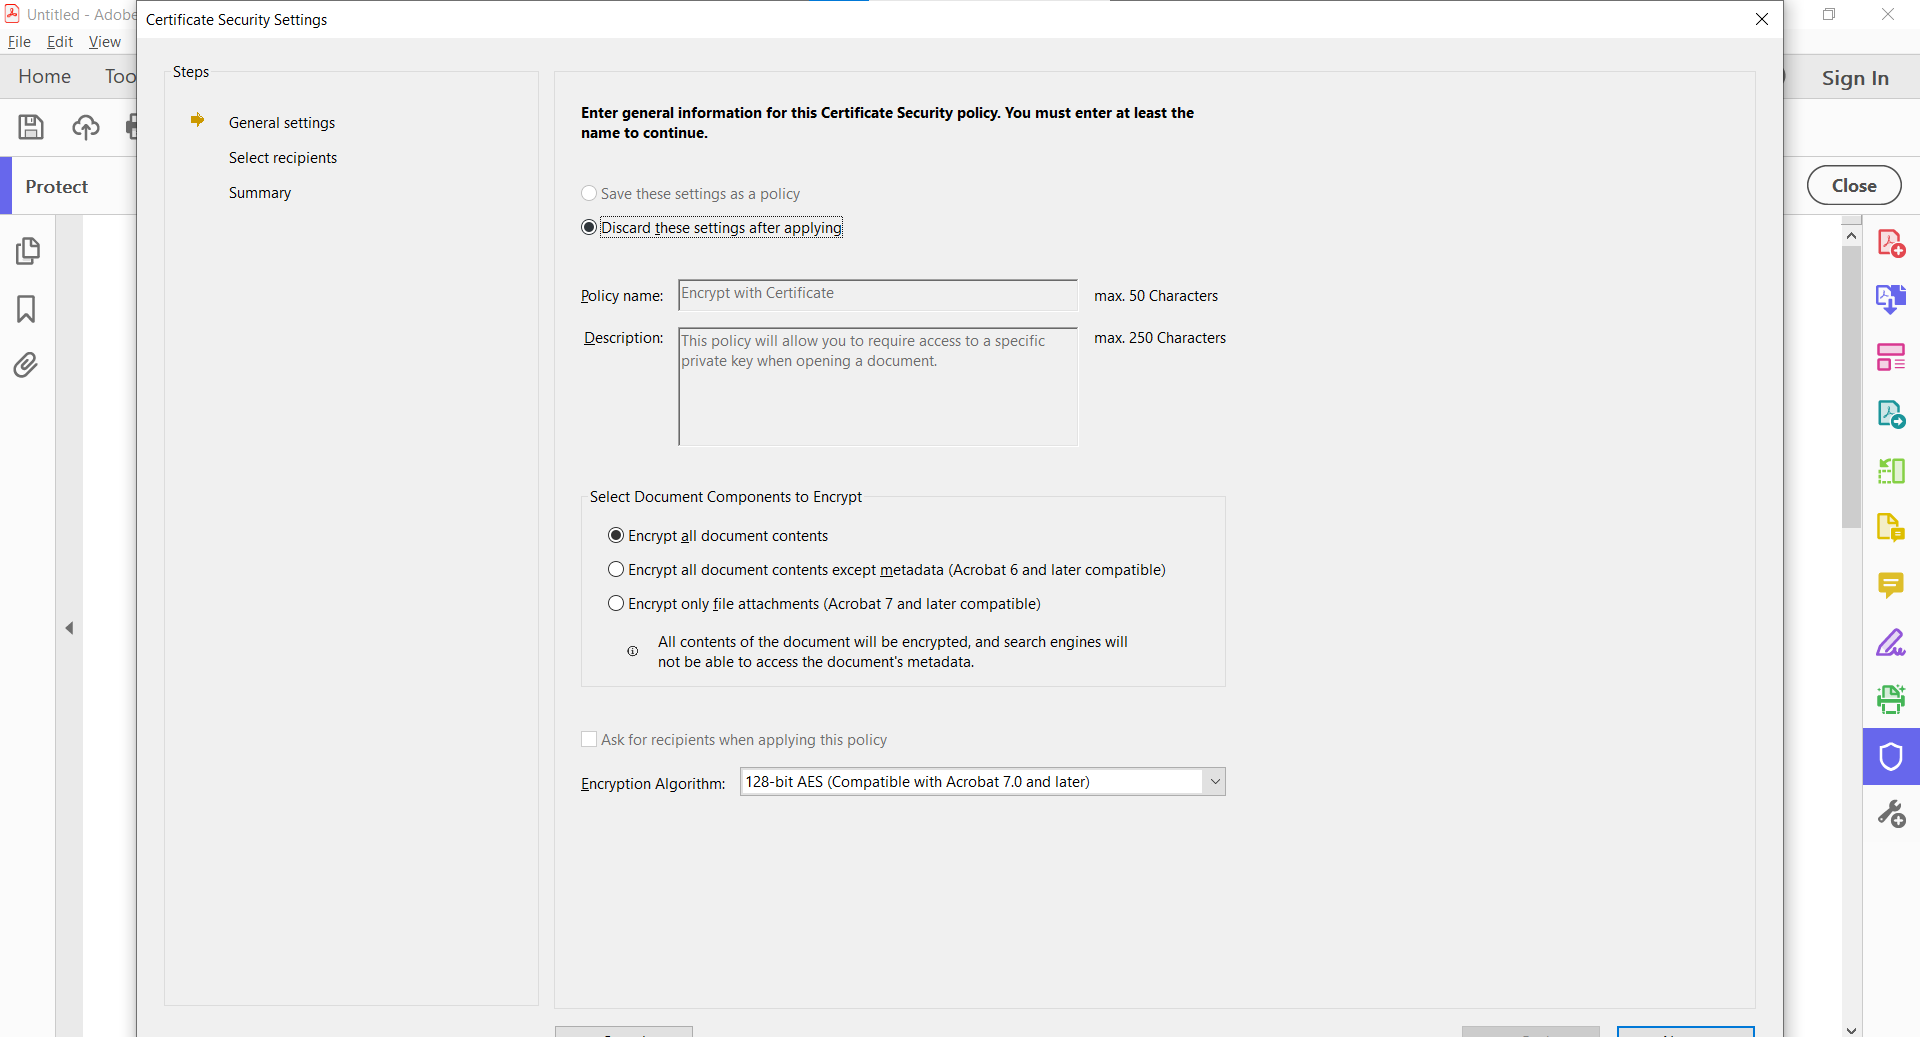
- Choose what elements of the document you want encrypted.
- Select the encryption algorithm.
- Under Digital Security, select Add Digital ID.
- Select your digital ID.
- Here you can add recipients, so select browse and choose the .pem file you downloaded.
- Select next to finish encrypting the file.
LastPass File Encryption
LastPass allows you to store files and other forms of information in your LastPass vault. This vault can be encrypted and shared with others. To export your LastPass vault, follow these steps.
- Log in to LastPass.
- Select Account Options or <your username> at the bottom of the menu.
- Go to Advanced > Export > LastPass Encrypted File.
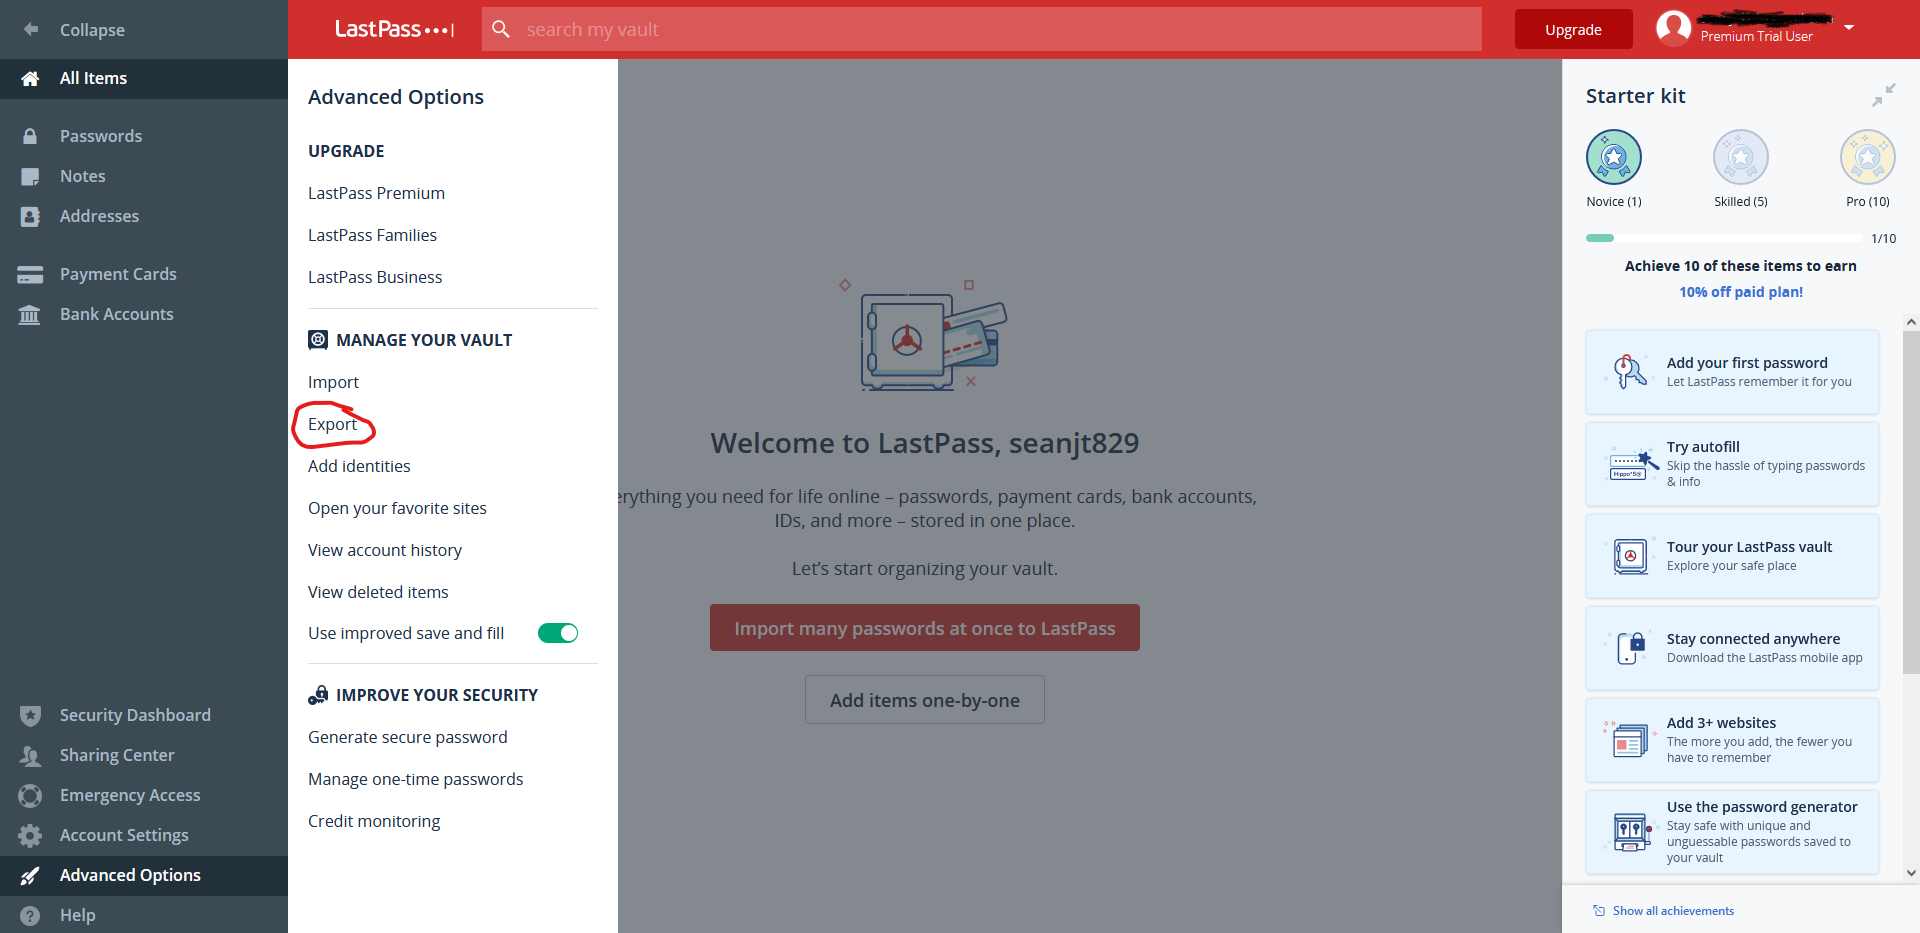
- You may be prompted to enter your master password.
- Create and confirm an encryption key.
- Follow the onscreen instructions and a CSV file will be downloaded containing your LastPass vault data.
To import this data on another computer, follow these steps.
- Log in to LastPass.
- Select Account Options > Advanced > Import.

- Select LastPass.
- Browse your computer and select the LastPass encrypted CSV file.
- Enter the Encryption key.
- Select the file you want to import.
The provided information and more can be found on the LastPass support page
VeraCrypt File Encryption
VeraCrypt is an open source encryption solution that is easy to use and works on Windows, macOS, and Linux. It can be downloaded from https://www.veracrypt.fr/en/Home.html. The most common way to use VeraCrypt is to create an encrypted volume and then store files inside the volume that need to be encrypted. Steps have been provided below for the creation and mounting of a VeraCrypt volume.
Creating a VeraCrypt Volume
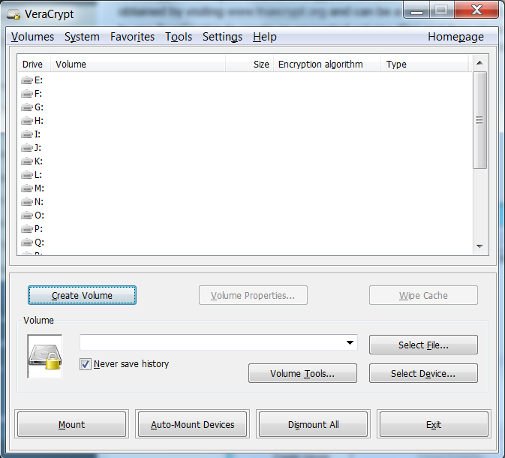
- Open up the VeraCrypt application and select Create Volume.
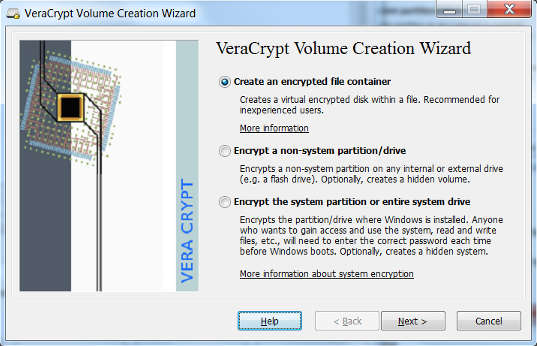
- Select Create an encrypted file container and click Next.
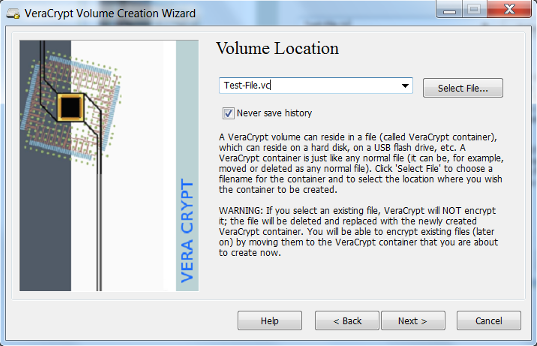
- Create a name and select a location to save the VeraCrypt volume that you will be creating and select Next. It is helpful if you create a volume name that ends with the extension
.vc. This will associate the volume with the VeraCrypt application.
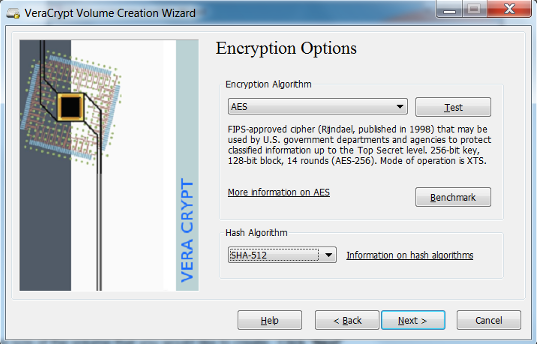
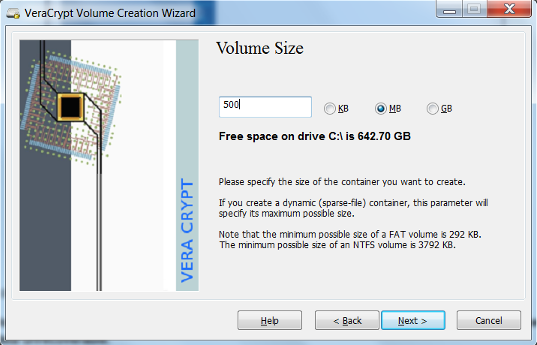
- VeraCrypt provides some options for encryption. Select the desired encryption algorithms and select Next. VeraCrypt uses the AES algorithm by default and is recommended for selection. In most cases a 500mb size volume is suitable. However this depends on the user’s need and should be adjusted accordingly.
- Create the size of the volume that you would like to create. Click Next.
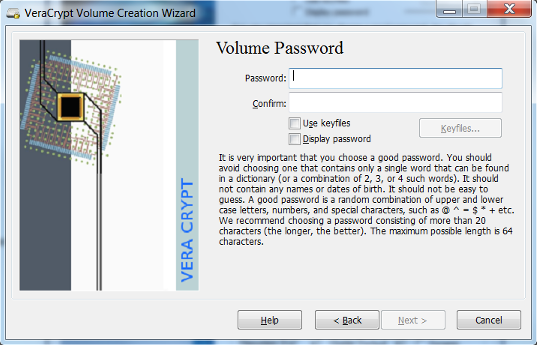
- Create a password for your encrypted volume. Click Next. The longer the password the better it is. It is important to not lose your password. A lost password will make the data unrecoverable.
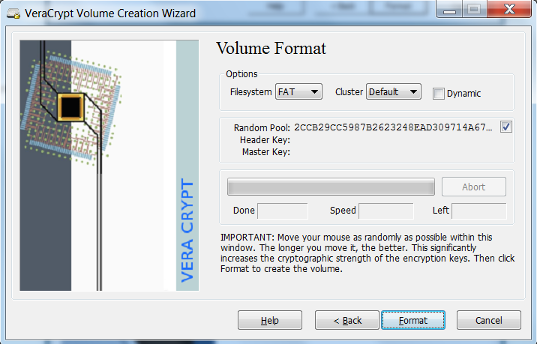
- Select the file system and click Format. The default is suitable in most cases.
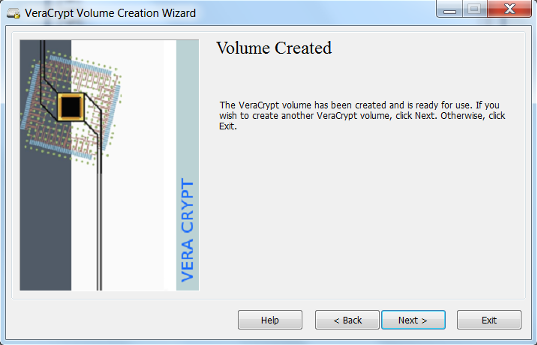
- Your volume has been created. Click Exit
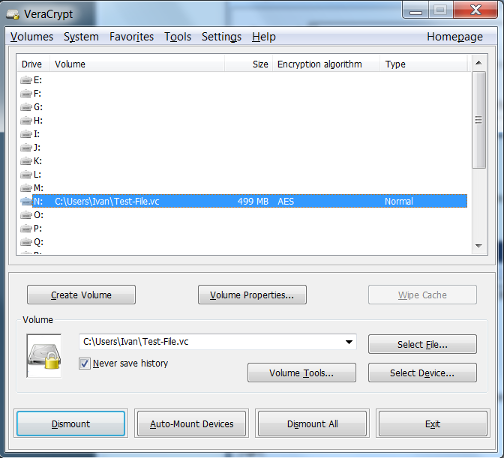
Mounting a VeraCrypt Volume
- Select the VeraCrypt volume that you would like to mount. Select the letter drive location you would like to use. Click Mount.
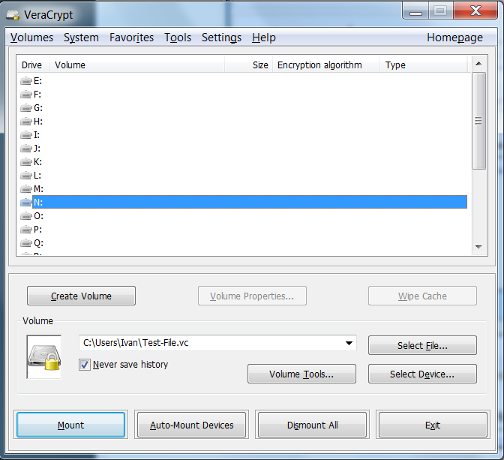
- Enter your password for the VeraCrypt volume. Click OK.

- The drive is now unencrypted and ready for use at the drive location you have selected. Save files and documents as you would normally do with a mounted drive.
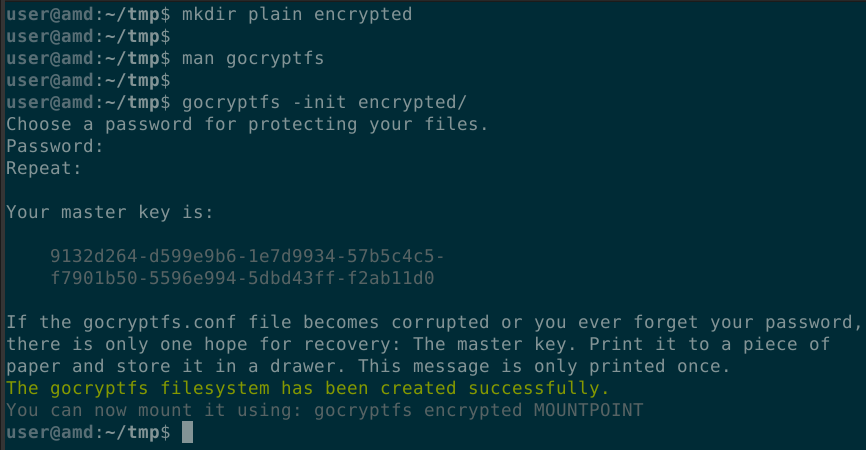
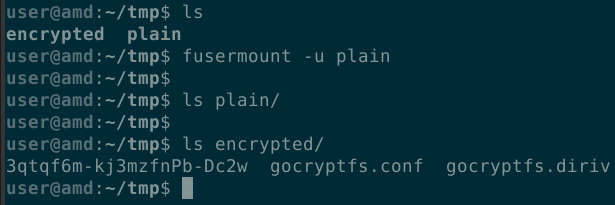
gocryptfs File Encryption (Linux Only)
- Initialize a new encrypted file system and set a strong, yet memorable password.
- Mount the encrypted file system and copy your files to it.

- When you are finished working with the files, unmount the encrypted file system.
Generic File Encryption
Any type of file may be encrypted using GPG. Both the sender and the recipient must have GPG encryption software installed as well as generated key pairs. There are OpenPGP implementations for Windows, Linux and macOS. If you would like to use GPG to encrypt files and need expert advice on key generation management and distribution, then please open a ServiceNow request.
3.10 - Encrypt Sensitive Data in Transit
Data is in transit when it is sent over a network. Some common examples are:
- Sending email
- Sending text messages
- Entering data into website forms
- Uploading files to a website
Two common implementations for encrypting sensitive data in transit are Open Secure Shell (OpenSSH) and Transport Layer Security (TLS).
OpenSSH is an open-source version of Secure Shell (SSH) used for remote login using the SSH protocol. Using SSH encrypts all traffic between clients and servers to prevent data hijacking, snooping, and other cyberattacks such as man-in-the-middle (MitM) attacks. It’s a more secure way to remotely control or transfer files between computers.
Transport Layer Security (TLS) is an encryption protocol that keeps data secure as it’s being transferred over a network.
Using OpenSSH for Windows
The following instructions apply for Windows Server 2022, Windows Server 2019, and Windows 10 (build 1809 and later).
Verify Prerequisites
- Open an elevated PowerShell session by running it as an Administrator.
- Validate that your environment meets the OpenSSH prerequisites.
- Type
winver.exeand press Enter to verify that the device is running at least Windows Server 2019 or Windows 10 (build 1809). - Run
$PSVersionTable.PSVersionto verify that your PowerShell version is at least 5.1. - Run the command below. If the output returns
True, then you’re a member of the built-in Administrators group.(New-Object Security.Principal.WindowsPrincipal([Security.Principal.WindowsIdentity]::GetCurrent())).IsInRole([Security.Principal.WindowsBuiltInRole]::Administrator)
- Type
Installation
- Run PowerShell as an Administrator.
- Verify that OpenSSH is available by running the following cmdlet:
If already installed, the command will return the following output:
Get-WindowsCapability -Online | Where-Object Name -like 'OpenSSH*'Name : OpenSSH.Client~~~~0.0.1.0 State : NotPresent Name : OpenSSH.Server~~~~0.0.1.0 State : NotPresent - Install the server or client components as needed:
# Install the OpenSSH Client
Add-WindowsCapability -Online -Name OpenSSH.Client~~~~0.0.1.0

# Install the OpenSSH Server
Add-WindowsCapability -Online -Name OpenSSH.Server~~~~0.0.1.0
Starting an OpenSSH Server
- Run PowerShell as an Administrator.
- Run the following commands to start the
sshd service.# Start the sshd service Start-Service sshd # OPTIONAL but recommended: Set-Service -Name sshd -StartupType 'Automatic' # Confirm the Firewall rule is configured. It should be created automatically by setup. Run the following to verify if (!(Get-NetFirewallRule -Name "OpenSSH-Server-In-TCP" -ErrorAction SilentlyContinue | Select-Object Name, Enabled)) { Write-Output "Firewall Rule 'OpenSSH-Server-In-TCP' does not exist, creating it..." New-NetFirewallRule -Name 'OpenSSH-Server-In-TCP' -DisplayName 'OpenSSH Server (sshd)' -Enabled True -Direction Inbound -Protocol TCP -Action Allow -LocalPort 22 } else { Write-Output "Firewall rule 'OpenSSH-Server-In-TCP' has been created and exists." }
Connecting to an OpenSSH Server
- Run PowerShell.
- Run the following command, replacing
domainwith your domain orusernamewith your username andservernamewith the OpenSSH server name.ssh domain\username@servername - If a message similar to the following one is outputted, typing
yeswill add the server to the list of known SSH hosts on your Windows client. Typingnowill abort the connection.The authenticity of host 'servername (10.00.00.001)' can't be established. ECDSA key fingerprint is SHA256:(<a large string>). Are you sure you want to continue connecting (yes/no)? - When prompted, enter your password. What you type will not appear in the terminal window for security purposes.
Using OpenSSH for Ubuntu
Client Installation
sudo apt install openssh-client
Server Installation
sudo apt install openssh-server
OpenSSH Server Configuration
The server configuration is located at /etc/ssh/sshd_config. For more information regarding server configuration options, refer to the OpenSSH manual by typing man sshd_config.
It’s good practice to make a copy of the configuration file before editing it. To make a copy and protect it from being edited, run the following commands:
sudo cp /etc/ssh/sshd_config /etc/ssh/sshd_config.original
sudo chmod a-w /etc/ssh/sshd_config.original
Once the configuration file is ready, restart the ssh service to apply changes:
sudo systemctl try-reload-or-restart ssh
OpenSSH Resources
Encrypting Sensitive Files
Two common implementations for encrypting sensitive data in transit are Open Secure Shell (OpenSSH) and Transport Layer Security (TLS).
- Put the data into a file.
- Encrypt the file using one of the file encryption methods described in section 3.9.
- Attach the encrypted file to an email, or place the encrypted file in your VT Google Drive.
- If you used a password for encryption, call the recipient on the phone and provide the password or share the password with the recipient via LastPass.
If you are entering sensitive data into a website or uploading files, ensure the website is using HTTPS by looking at the URL in your browser. Most browsers will also show a lock symbol next to the URL to indicate it’s safe.
3.11 - Encrypt Sensitive Data at Rest
Sensitive data is easiest encrypted at rest via storage-layer encryption, otherwise known as server-side encryption (SSE). SSE is currently enforced by default in most applications, such as in Azure disks and newer Amazon S3 buckets.
However, using SSE only meets the minimum requirement of this safeguard. To better protect sensitive data at rest, one could additionally implement client-side encryption (also known as application-layer encryption), use double encryption at rest, or use end-to-end encryption.
Azure
By default, Azure OS and data disks are encrypted at rest. This does not include temporary disks unless encryption at host is enabled. For further information on server-side encryption, how to enable end-to-end encryption, or using double encryption at rest, consult the Azure disk encryption documentation.
Amazon S3
All Amazon S3 buckets since January 5, 2023 have server-side encryption enabled by default. To manage encryption keys or set up custom encryption, please refer to the AWS Key Management Service Developer Guide. For more information on Amazon S3 bucket encryption, see the Amazon S3 User Guide.
Oracle
Oracle buckets and objects are encrypted by default. Object Storage allows for a specified Master Encryption Key to be used instead. To manage encryption keys or specify a master key to be used, refer to the Oracle Cloud Infrastructure Documentation on encrypting data.
3.12 - Segment Data Processing and Storage Based on Sensitivity
Virginia Tech provides a segmented network to do sensitive work on. See the links below for more information.
Other
If you have questions that are not covered in these procedures, please contact the VT IT Security Office itso@vt.edu for a consultation.